
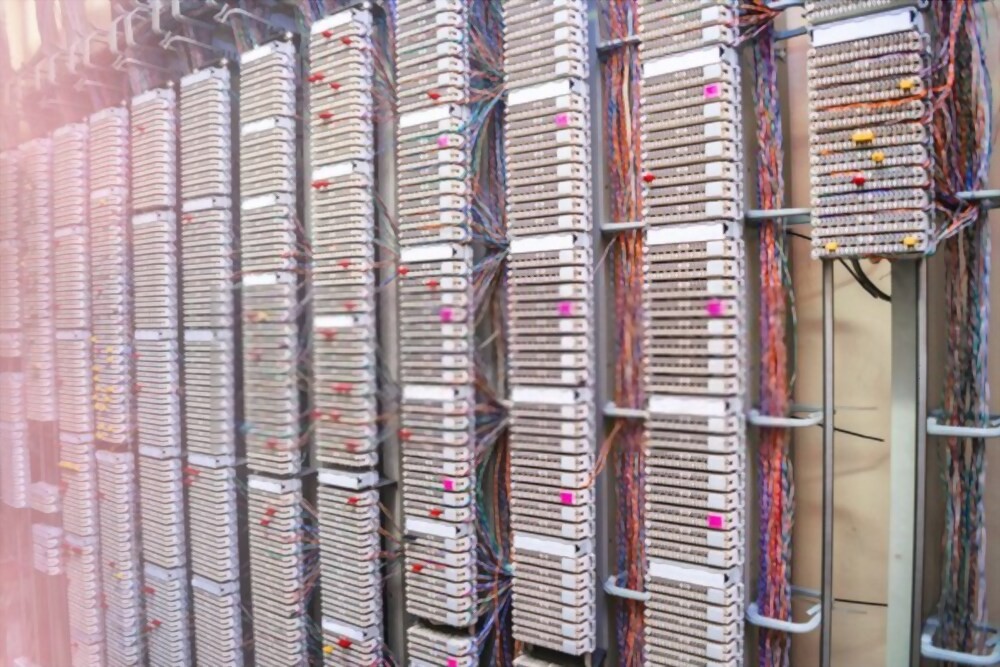
Patch Panels
Cable management has always been a difficult task; since patch panels are introduced, it is no longer a problem.
A patch panel can be described as a device with a number of ports, which usually are of the same type; each port can be connected to a wire that joins with a different device.
Although the world is moving towards wireless technology, the wired system has its own benefits. When you need higher speed and secure connection at defined locations, you always prefer to have wired assembly.
- Uses
It is mostly used by the IT departments, broadcasting studios, and at large gatherings where you need to connect multiple different devices at a time. The patch panels can also be used at your home and offices to ease out wire distribution and management.
Are Patch Panels Necessary?
Cable management is something is something which is needed at all times no matter where you are.
Patch Panels helps you in the centralization of wired networks; eventually, it allows you to easily add or remove devices and troubleshooting network connections by making the management more straightforward and efficient.
In addition, it will save a lot of space, money, and other resources and will also allow you to move freely around the area.
Installation
If you are familiar with the use and benefits of the patch panels, you will definitely want to install them but afraid of the installation method.
As you are here, you don’t need to worry about it as we are going to present you with a comprehensive solution with simple to follow instructions for installing the patch panels without any involvement of welding processes.
- Initial Stage
Before starting any process, the first thing you should always do is plan and analysis. In the case of installing patch panels, you need to see that at which place you are going to install them. Is it feasible here or not?
For this, you may want to create a mind map positioning all the devices and wires; it will also help you in determining the length, budget and you make amendments in the design even before the installation.
Having a map or a design will save your time, and you will know precisely the way wires are going to be placed safely.
Check for the type of cables and then get the applicable patch panels, and for installation, you need to have a module punch down tool, wire crimper, cable strippers, tester, and screwdrivers.
You also need to check the wire length and the quantity required. After you finalized the space for it, start gathering the appropriate tools and equipment.
Once you have all the tools and equipment, you may start the installation process; make sure that you are not disturbed and have enough time to complete the process in one go.
- Attachment
Normally, the patch panels can be placed at three positions if you are installing them on a rack. It depends on your wire setting that from which place the wires are going to be connected with the panel.
If the cables are going through the top, the patch panel will be placed at the top position, if the wires are going through the ground, then the patch panel will be placed at the bottom, and if the cables are placed and coming from the sides, then the patch panel will be positioned in a center.
Firstly, you need to fit the bracket panel in the rack position where you are going to install the patch panel, secure it with the help of screwdrivers and bolts.
Now all you need is to hold the patch panel, move it forward in a position at which you want to place it, and then secure it with suitable nuts and screws.
Untwist the cable wires, strip the patch of cables and place it in the appropriate ports. With the help of the patch panel punch down tool, firmly place the wire in the port, and if its spreads over, you can remove it with the wire cutter. Use the strap to hold and secure the cables in one place.
Be careful of the wires during this phase as it can get affected easily by bending or folding. Check that the rack is mounted straight and the patch panel is fitted accurately. Attach the cables accordingly and then connect them with the specific devices.
For easy identification and management, label the cables with suitable tags so that you don’t face any difficulty in tracing the specific device connection. Use the cable ties or fastener to secure the lines for further use.
You can use any method for cable management according to the condition and the environment.
Horizontal Cable Management, Vertical Cable Management, or simply tying and labeling the cables are the most common techniques. Patch cable organizers and color coding are also helpful in wire management.
- Testing
The testing phase is the last and important phase in the installation process. At this point, you verify and validate the connections you have placed and also check their working and functionality. Inspection is carried out, and if any fault comes to notice, you fix it before starting the operations.
In the end, we would say that there is no doubt that the patch panels have made our life much more comfortable.
It has made cable management easier for all in the best possible way, and by going through this article, anyone can install the patch panels easily without any difficult method and enjoy the smooth and efficient network.